Caffe Learning Notes(4)
模块学习——Layer
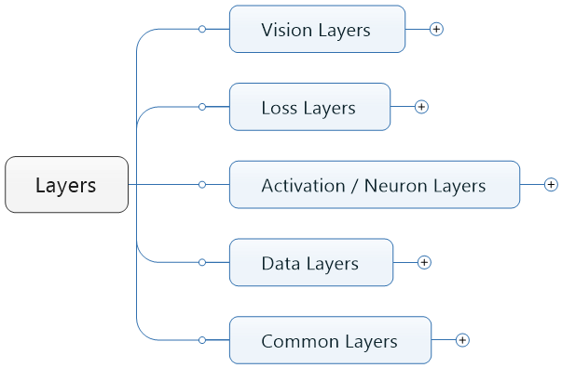
Activation/NeuronLayer类 定义于neuron_layers.hpp中,其派生类主要是元素级别的运算(比如Dropout运算,激活函数ReLu,Sigmoid等),运算均为同址计算(in-place computation,返回值覆盖原值而占用新的内存)。LossLayer类 定义于loss_layers.hpp中,其派生类会产生loss,只有这些层能够产生loss。DataLayer定义于data_layer.hpp中,作为网络的最底层,主要实现数据格式的转换。VisionLayer 定义于vision_layers.hpp,实现特征表达功能,更具体地说包含卷积操作,Pooling操作,他们基本都会产生新的内存占用(Pooling相对较小)。Common Layers定义于common_layers.hpp,Caffe提供了单个层与多个层的连接,并在这个头文件中声明。这里还包括了常用的全连接层InnerProductLayer类。
首先来看layer类的构造部分,以及Public部分的函数
template <typename Dtype>
class Layer {
 public:
  explicit Layer(const LayerParameter& param)
    : layer_param_(param), is_shared_(false) {
      // Set phase and copy blobs (if there are any).
      phase_ = param.phase();
      if (layer_param_.blobs_size() > 0) {
        blobs_.resize(layer_param_.blobs_size());
        for (int i = 0; i < layer_param_.blobs_size(); ++i) {
          blobs_[i].reset(new Blob<Dtype>());
          blobs_[i]->FromProto(layer_param_.blobs(i));
        }
      }
    }
  virtual ~Layer() {}
Layer层的主要的参数和成员变量:
 /** The protobuf that stores the layer parameters */
 // 层说明参数,从protocal buffers格式的网络结构说明文件中读取
  LayerParameter layer_param_;
  /** The phase: TRAIN or TEST */
  // 层状态,参与网络的训练还是测试
  Phase phase_;
  /** The vector that stores the learnable parameters as a set of blobs. */
  // 层权值和偏置参数,使用向量是因为权值参数和偏置是分开保存在两个blob中的
  vector<shared_ptr<Blob<Dtype> > > blobs_;
  /** Vector indicating whether to compute the diff of each param blob. */
  // 标志每个top blob是否需要计算反向传递的梯度值
  vector<bool> param_propagate_down_;

  /** The vector that indicates whether each top blob has a non-zero weight in
   *  the objective function. */
   // 每一个top blob中是否有非零的权值
  vector<Dtype> loss_;
首先获得当前网络的phase,是train还是test,在初始化列表初始化LayerParameter,之后blobs_这里存放的是一个指向blob类的shared_ptr指针的一个vector,在这里是申请空间,然后将传入的layer_param中的blob拷贝过来。
初始化函数SetUp()
/**
   * @brief 实现每个layer对象的setup函数
   * @param bottom
   * 层的输入数据,blob中的存储空间已申请
   * @param top
   * 层的输出数据,blob对象以构造但是其中的存储空间未申请,
   * 具体空间大小需根据bottom blob大小和layer_param_共同决定,具体在Reshape函数现实

   * 1. 检查输入输出blob个数是否满足要求,每个层能处理的输入输出数据不一样
   * 2. 调用LayerSetUp函数初始化特殊的层,每个Layer子类需重写这个函数完成定制的初始化
   * 3. 调用Reshape函数为top blob分配合适大小的存储空间
   * 4. 为每个top blob设置损失权重乘子,非LossLayer为的top blob其值为零
   *
   * 此方法非虚函数,不用重写,模式固定
   */
  void SetUp(const vector<Blob<Dtype>*>& bottom,
      const vector<Blob<Dtype>*>& top) {
    CheckBlobCounts(bottom, top);
    LayerSetUp(bottom, top);
    Reshape(bottom, top);
    SetLossWeights(top);
  }
这里是Setup函数,首先check 这个bottom和top的blob是否正确,再调用Layersetup对每一具体的层做进一步设置,之后再做reshape来设置top blobs和internal buffer。最后再设置loss weight multiplier 的blob对每一个非零的loss和weight,一般这个方法被继承之后是不会被重写的。
每个子类Layer必须重写的初始化函数LayerSetUp和Reshape函数。
LayerSetup就是对具体某一个layer的setup,被上面的那个函数所调用,ShareInParallel和IsShared和SetShared分别是用来返回并行状态和获得这一layer是否被多个nets所共享,默认是除了data layer都是关闭的。在多个GPU下的Train阶段以及share是true的情况下,is_shared将会被置成true。
Reshape函数完成top blob形状的设置并为其分配存储空间。
virtual inline bool ShareInParallel()
inline bool IsShared() const
inline void SetShared(bool is_shared)

 /**
   * @brief Does layer-specific setup: your layer should implement this function
   *        as well as Reshape.
   *        定制初始化,每个子类layer必须实现此虚函数
   *
   * @param bottom
   *     the preshaped input blobs, whose data fields store the input data for
   *     this layer
   *     输入blob, 数据成员data_和diff_存储了相关数据
   * @param top
   *     the allocated but unshaped output blobs
   *     输出blob, blob对象已构造但数据成员的空间尚未申请
   *
   * This method should do one-time layer specific setup. This includes reading
   * and processing relevent parameters from the <code>layer_param_</code>.
   * Setting up the shapes of top blobs and internal buffers should be done in
   * <code>Reshape</code>, which will be called before the forward pass to
   * adjust the top blob sizes.
   * 此方法执行一次定制化的层初始化,包括从layer_param_读入并处理相关的层权值和偏置参数,
   * 调用Reshape函数申请top blob的存储空间
   */
  virtual void LayerSetUp(const vector<Blob<Dtype>*>& bottom,
      const vector<Blob<Dtype>*>& top) {}

  virtual void Reshape(const vector<Blob<Dtype>*>& bottom,
      const vector<Blob<Dtype>*>& top) = 0;
前向传播函数Forward和反向传播函数Backward。这两个函数非虚函数,它们内部会调用如下虚函数完成数据前向传递和误差反向传播,根据执行环境的不同每个子类Layer必须重写CPU和GPU版本
  /** @brief Using the CPU device, compute the layer output. */
  virtual void Forward_cpu(const vector<Blob<Dtype>*>& bottom,
      const vector<Blob<Dtype>*>& top) = 0;
  /**
   * @brief Using the GPU device, compute the layer output.
   *        Fall back to Forward_cpu() if unavailable.
   */
  virtual void Forward_gpu(const vector<Blob<Dtype>*>& bottom,
      const vector<Blob<Dtype>*>& top) {
    // LOG(WARNING) << "Using CPU code as backup.";
    return Forward_cpu(bottom, top);
  }

  /**
   * @brief Using the CPU device, compute the gradients for any parameters and
   *        for the bottom blobs if propagate_down is true.
   */
  virtual void Backward_cpu(const vector<Blob<Dtype>*>& top,
      const vector<bool>& propagate_down,
      const vector<Blob<Dtype>*>& bottom) = 0;
  /**
   * @brief Using the GPU device, compute the gradients for any parameters and
   *        for the bottom blobs if propagate_down is true.
   *        Fall back to Backward_cpu() if unavailable.
   */
  virtual void Backward_gpu(const vector<Blob<Dtype>*>& top,
      const vector<bool>& propagate_down,
      const vector<Blob<Dtype>*>& bottom) {
    // LOG(WARNING) << "Using CPU code as backup.";
    Backward_cpu(top, propagate_down, bottom);
  }
这个函数被setup调用,主要是check bottom和top 的blob是否match,这里面用了上面提到的ExactBottomBlobs()等函数
virtual void CheckBlobCounts(const vector<Blob<Dtype>*>& bottom, const vector<Blob<Dtype>*>& top)
SetLoss是非常重要的一个步骤,是被SetUp调用来初始化top bottom的weights,并且存储非零的loss weights 在diff blob里面
inline void SetLossWeights(const vector<Blob<Dtype>*>& top)
Data Layer
data_layer应该是网络的最底层,主要是将数据送给blob进入到net中,在data_layer中存在多个跟data_layer相关的类
- BaseDataLayer
- BasePrefetchingDataLayer
- DataLayer
- DummyDataLayer
- HDF5DataLayer
- HDF5OutputLayer
- ImageDataLayer
- MemoryDataLayer
- WindowDataLayer
- Batch
首先Layer是基类,这个之前就已经提到过了。其次看HDF5相关的类有两个,一个是HDF5DataLayer,另一个是HDF5OutputLayer,主要是基于HDF5数据格式的读取和存储
Data_layer头文件如下:
#include <string>
#include <utility>
#include <vector>
#include "hdf5.h"

#include "caffe/blob.hpp"
#include "caffe/common.hpp"
#include "caffe/data_reader.hpp"
#include "caffe/data_transformer.hpp"
#include "caffe/filler.hpp"
#include "caffe/internal_thread.hpp"
#include "caffe/layer.hpp"
#include "caffe/proto/caffe.pb.h"
#include "caffe/util/blocking_queue.hpp"
#include "caffe/util/db.hpp"
还有几个跟data相关的头文件比如data_read.hpp,data_transformer.hpp 其中data_reader主要是负责数据的读取,传送到data layer中。并且对于每一个source,都会开一一起独立的reading thread读取线程,几十有多个solver在并行的跑。比如在多GPU训练的时候,可以保证对于数据库的读取是顺序的。
data_transformer.hpp里面的DataTransformer这个类,这个类我们要关注一下,这个类主要能对input data 执一些预处理操作,比如缩放、镜像、减去均值。同时还支持一些随机的操作。
其核心的函数如下,这里总共有5个常见的Transform函数,其中所有函数的第二部分是相同的,都是一个目标blob,而输入根据输入的情况可以有所选择,可以是blob,也可以是opencv的mat 结构,或者proto中定义的datum结构。
void Transform(const Datum& datum, Blob<Dtype>* transformed_blob);
void Transform(const vector<Datum> & datum_vector, Blob<Dtype>* transformed_blob);
void Transform(const vector<cv::Mat> & mat_vector, Blob<Dtype>* transformed_blob);
void Transform(const cv::Mat& cv_img, Blob<Dtype>* transformed_blob);
void Transform(Blob<Dtype>* input_blob, Blob<Dtype>* transformed_blob);
TransformationParameter是该类构造器中需要传入的一些变形参数,相关的操作定义在proto中,摘录如下,可以看到总共有sacle, mirror, crop_size, mean_file, mean_value, force_color, force_grey 共7个相关操作。
message TransformationParameter {
  optional float scale = 1 [default = 1];
  optional bool mirror = 2 [default = false];
  optional uint32 crop_size = 3 [default = 0];
  optional string mean_file = 4;
  repeated float mean_value = 5;
  optional bool force_color = 6 [default = false];
  optional bool force_gray = 7 [default = false];
}
最重要的就是类内的layerSetup.首先我们来看DataLayer的DataLayerSetUp
void DataLayer<Dtype>::DataLayerSetUp(const vector<Blob<Dtype>*>& bottom,
      const vector<Blob<Dtype>*>& top) {
  const int batch_size = this->layer_param_.data_param().batch_size();
  //获得相应的datum,用来初始化top blob
  Datum& datum = *(reader_.full().peek());
  //使用data_transformer 来计算根据datum的期望blob的shape
  vector<int> top_shape = this->data_transformer_->InferBlobShape(datum);
  this->transformed_data_.Reshape(top_shape);
  //首先reshape top[0],再根据batch的大小进行预取
  top_shape[0] = batch_size;
  top[0]->Reshape(top_shape);
  for (int i = 0; i < this->PREFETCH_COUNT; ++i) {
    this->prefetch_[i].data_.Reshape(top_shape);
  }
  LOG(INFO) << "output data size: " << top[0]->num() << ","
      << top[0]->channels() << "," << top[0]->height() << ","
      << top[0]->width();
  // 同样reshape label的blob的shape
  if (this->output_labels_) {
    vector<int> label_shape(1, batch_size);
    top[1]->Reshape(label_shape);
    for (int i = 0; i < this->PREFETCH_COUNT; ++i) {
      this->prefetch_[i].label_.Reshape(label_shape);
    }
  }
}
还有很多其他的Data_Layer的初始化,可以参考:Caffe源码解析4:Data_layer
Conv Layer
这里先引用一个其他博客里总结的Conv Layer的类关系图
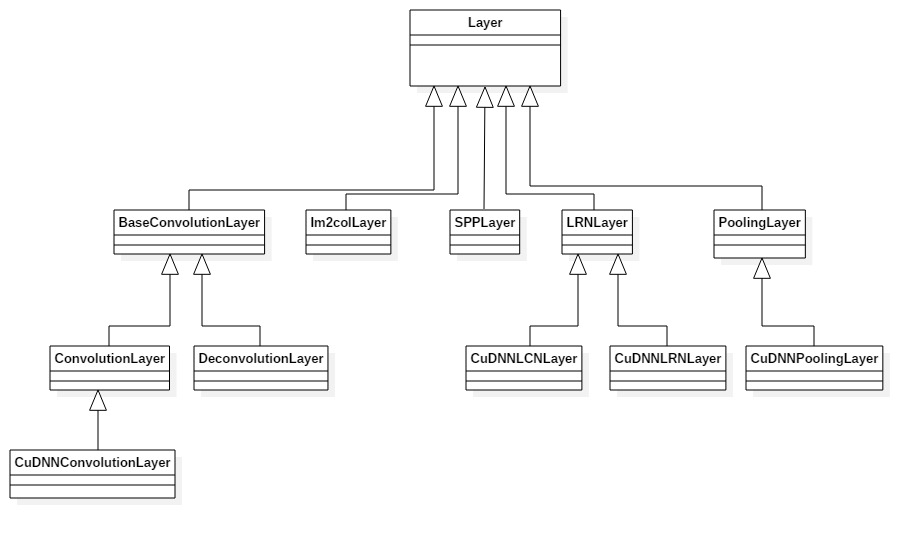
BaseConvolutionLayer
其继承自Layer,是一个卷积以及反卷积操作的基类,首先我们来看BaseConvolutionLayer的LayerSetUp函数
void BaseConvolutionLayer<Dtype>::LayerSetUp(const vector<Blob<Dtype>*>& bottom,
      const vector<Blob<Dtype>*>& top)
  //首先这里主要是在配置卷积kernel 的size,padding,stride以及inputs
  ConvolutionParameter conv_param = this->layer_param_.convolution_param();
  force_nd_im2col_ = conv_param.force_nd_im2col();
  channel_axis_ = bottom[0]->CanonicalAxisIndex(conv_param.axis());
  const int first_spatial_axis = channel_axis_ + 1;
  const int num_axes = bottom[0]->num_axes();
  num_spatial_axes_ = num_axes - first_spatial_axis;
  CHECK_GE(num_spatial_axes_, 0);
  vector<int> bottom_dim_blob_shape(1, num_spatial_axes_ + 1);
  vector<int> spatial_dim_blob_shape(1, std::max(num_spatial_axes_, 1));
  // 设置kernel的dimensions
  kernel_shape_.Reshape(spatial_dim_blob_shape);
  int* kernel_shape_data = kernel_shape_.mutable_cpu_data();
接着是设置相应的stride dimensions,对于2D,设置在h和w方向上的stride,对于kernel的pad也做相应设置
pad_.Reshape(spatial_dim_blob_shape);
int* pad_data = pad_.mutable_cpu_data();
pad_data[0] = conv_param.pad_h();
pad_data[1] = conv_param.pad_w();
接下来是对widths 和 bias 做设置和填充,其中blob[0]里面存放的是filter weights,而blob[1]里面存放的是biases,当然bias是可选的,也可以没有
//设置相应的shape,并检查
vector<int> weight_shape(2);
weight_shape[0] = conv_out_channels_;
weight_shape[1] = conv_in_channels_ / group_;

bias_term_ = this->layer_param_.convolution_param().bias_term();
vector<int> bias_shape(bias_term_, num_output_);

//填充权重
this->blobs_[0].reset(new Blob<Dtype>(weight_shape));
shared_ptr<Filler<Dtype> > weight_filler(GetFiller<Dtype>(
    this->layer_param_.convolution_param().weight_filler()));
weight_filler->Fill(this->blobs_[0].get());
//填充偏置项
if (bias_term_) {
  this->blobs_[1].reset(new Blob<Dtype>(bias_shape));
  shared_ptr<Filler<Dtype> > bias_filler(GetFiller<Dtype>(
      this->layer_param_.convolution_param().bias_filler()));
  bias_filler->Fill(this->blobs_[1].get());
}
ConvolutionLayer 继承了BaseConvolutionLayer,主要作用就是将一副image做卷积操作,使用学到的filter的参数和biaes。同时在Caffe里面,卷积操作做了优化,变成了一个矩阵相乘的操作。其中有两个比较主要的函数是im2col以及col2im。
图中上半部分是一个传统卷积,下图是一个矩阵相乘的版本。
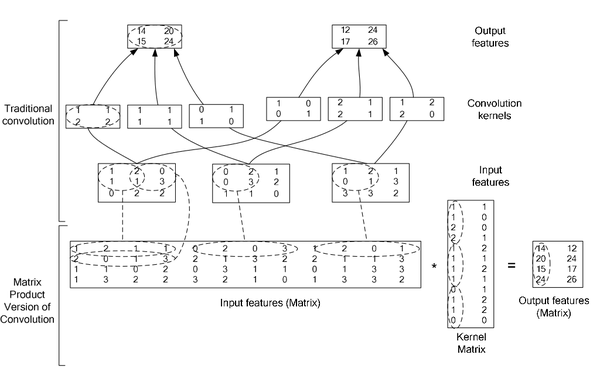
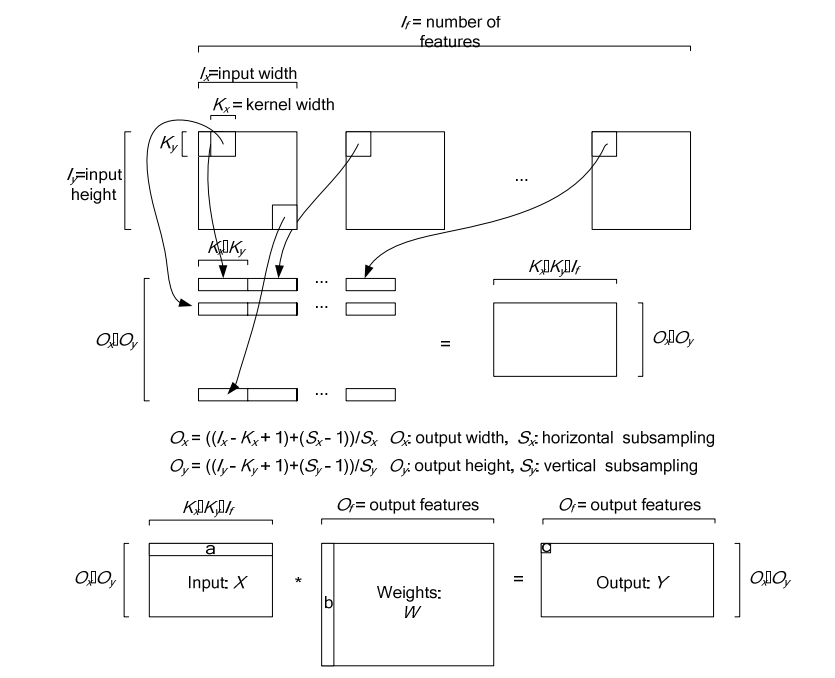
下图是在一个卷积层中将卷积操作展开的具体操作过程,他里面按照卷积核的大小取数据然后展开,在同一张图里的不同卷积核选取的逐行摆放,不同N的话,就在同一行后面继续拼接,不同个可以是多个通道,但是需要注意的是同一行里面每一段都应该对应的是原图中中一个位置的卷积窗口。
对于卷积层中的卷积操作,还有一个group的概念要说明一下,groups是代表filter 组的个数。引入gruop主要是为了选择性的连接卷积层的输入端和输出端的channels,否则参数会太多。每一个group 和1/group的input 通道和 1/group 的output通道进行卷积操作。比如有4个input, 8个output,那么1-4属于第一组,5-8属于第二个gruop。
ConvolutionLayer里面,主要重写了Forward_cpu和Backward_cpu
void ConvolutionLayer<Dtype>::Forward_cpu(const vector<Blob<Dtype>*>& bottom,
      const vector<Blob<Dtype>*>& top) {
  const Dtype* weight = this->blobs_[0]->cpu_data();
  for (int i = 0; i < bottom.size(); ++i) {
    const Dtype* bottom_data = bottom[i]->cpu_data();
    Dtype* top_data = top[i]->mutable_cpu_data();
    for (int n = 0; n < this->num_; ++n) {
      this->forward_cpu_gemm(bottom_data + n * this->bottom_dim_, weight,
          top_data + n * this->top_dim_);
      if (this->bias_term_) {
        const Dtype* bias = this->blobs_[1]->cpu_data();
        this->forward_cpu_bias(top_data + n * this->top_dim_, bias);
      }
    }
  }
}
可以看到其实这里面他调用了forward_cpu_gemm,而这个函数内部又调用了math_function里面的caffe_cpu_gemm的通用矩阵相乘接口,GEMM的全称是General Matrix Matrix Multiply。其基本形式如下:
C=alpha∗op(A)∗op(B)+beta∗C,
template <typename Dtype>
void ConvolutionLayer<Dtype>::Backward_cpu(const vector<Blob<Dtype>*>& top,
      const vector<bool>& propagate_down, const vector<Blob<Dtype>*>& bottom) {
   //反向传播梯度误差
  const Dtype* weight = this->blobs_[0]->cpu_data();
  Dtype* weight_diff = this->blobs_[0]->mutable_cpu_diff();
  for (int i = 0; i < top.size(); ++i) {
    const Dtype* top_diff = top[i]->cpu_diff();
    const Dtype* bottom_data = bottom[i]->cpu_data();
    Dtype* bottom_diff = bottom[i]->mutable_cpu_diff();

    //如果有bias项,计算Bias导数
    if (this->bias_term_ && this->param_propagate_down_[1]) {
      Dtype* bias_diff = this->blobs_[1]->mutable_cpu_diff();
      for (int n = 0; n < this->num_; ++n) {
        this->backward_cpu_bias(bias_diff, top_diff + n * this->top_dim_);
      }
    }
    //计算weight
    if (this->param_propagate_down_[0] || propagate_down[i]) {
      for (int n = 0; n < this->num_; ++n) {
        // 计算weights权重的梯度
        if (this->param_propagate_down_[0]) {
          this->weight_cpu_gemm(bottom_data + n * this->bottom_dim_,
              top_diff + n * this->top_dim_, weight_diff);
        }
        //计算botttom数据的梯度,向后传递
        if (propagate_down[i]) {
          this->backward_cpu_gemm(top_diff + n * this->top_dim_, weight,
              bottom_diff + n * this->bottom_dim_);
        }
      }
    }
  }
}
Neuron Layer
Neuron Layer,顾名思义这里就是神经元,激活函数的相应层。我们知道在blob进入激活函数之前和之后他的size是不会变的,而且激活值也就是输出 y 只依赖于相应的输入 x 。在Caffe里面所有的layer的实现都放在src文件夹下的layer文件夹中,基本上很多文章里应用到的layer类型它都有cpu和cuda的实现。
在caffe里面NeuronLayer比较多,在此罗列了一下
- AbsValLayer
- BNLLLayer
- DropoutLayer
- ExpLayer
- LogLayer
- PowerLayer
- ReLULayer
- CuDNNReLULayer
- SigmoidLayer
- CuDNNSigmoidLayer
- TanHLayer
- CuDNNTanHLayer
- ThresholdLayer
- PReLULayer
ReLULayer
目前在激活层的函数中使用ReLU是非常普遍的,一般我们在看资料或者讲义中总是提到的是Sigmoid函数,它比Sigmoid有更快的收敛性,因为sigmoid在收敛的时候越靠近目标点收敛的速度会越慢,也是其函数的曲线形状决定的。而ReLULayer则相对收敛更快,具体可以看Krizhevsky 12年的那篇ImageNet CNN文章有更详细的介绍。
其在cafffe中的forward和backward函数为
template <typename Dtype>
void ReLULayer<Dtype>::Forward_cpu(const vector<Blob<Dtype>*>& bottom,
    const vector<Blob<Dtype>*>& top) {
  const Dtype* bottom_data = bottom[0]->cpu_data();
  Dtype* top_data = top[0]->mutable_cpu_data();
  const int count = bottom[0]->count();
  Dtype negative_slope = this->layer_param_.relu_param().negative_slope();
  for (int i = 0; i < count; ++i) {
    top_data[i] = std::max(bottom_data[i], Dtype(0))
        + negative_slope * std::min(bottom_data[i], Dtype(0));
  }
}

template <typename Dtype>
void ReLULayer<Dtype>::Backward_cpu(const vector<Blob<Dtype>*>& top,
    const vector<bool>& propagate_down,
    const vector<Blob<Dtype>*>& bottom) {
  if (propagate_down[0]) {
    const Dtype* bottom_data = bottom[0]->cpu_data();
    const Dtype* top_diff = top[0]->cpu_diff();
    Dtype* bottom_diff = bottom[0]->mutable_cpu_diff();
    const int count = bottom[0]->count();
    Dtype negative_slope = this->layer_param_.relu_param().negative_slope();
    for (int i = 0; i < count; ++i) {
      bottom_diff[i] = top_diff[i] * ((bottom_data[i] > 0)
          + negative_slope * (bottom_data[i] <= 0));
    }
  }
}
其余包括Sigmoid可以参考Caffe源码解析6:Neuron_Layer
Dropout Layer
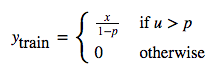
Dropout Layer现在是非常常用的一种网络层,只用在训练阶段,一般用在网络的全连接层中,可以减少网络的过拟合问题。其思想是在训练过程中随机的将一部分输入x之置为0。
其forward_cpu和backward_cpu为:
template <typename Dtype>
void DropoutLayer<Dtype>::Forward_cpu(const vector<Blob<Dtype>*>& bottom,
    const vector<Blob<Dtype>*>& top) {
  const Dtype* bottom_data = bottom[0]->cpu_data();
  Dtype* top_data = top[0]->mutable_cpu_data();
  unsigned int* mask = rand_vec_.mutable_cpu_data();
  const int count = bottom[0]->count();
  if (this->phase_ == TRAIN) {
    // Create random numbers构造随机数,这里是通过向量掩码来和bottom的数据相乘,scale_是控制undropped的比例
    caffe_rng_bernoulli(count, 1. - threshold_, mask);
    for (int i = 0; i < count; ++i) {
      top_data[i] = bottom_data[i] * mask[i] * scale_;
    }
  } else {
    caffe_copy(bottom[0]->count(), bottom_data, top_data);
  }
}

template <typename Dtype>
void DropoutLayer<Dtype>::Backward_cpu(const vector<Blob<Dtype>*>& top,
    const vector<bool>& propagate_down,
    const vector<Blob<Dtype>*>& bottom) {
  if (propagate_down[0]) {
    const Dtype* top_diff = top[0]->cpu_diff();
    Dtype* bottom_diff = bottom[0]->mutable_cpu_diff();
    if (this->phase_ == TRAIN) {
      const unsigned int* mask = rand_vec_.cpu_data();
      const int count = bottom[0]->count();
      for (int i = 0; i < count; ++i) {
        bottom_diff[i] = top_diff[i] * mask[i] * scale_;
      }
    } else {
      caffe_copy(top[0]->count(), top_diff, bottom_diff);
    }
  }
}
Polling Layer
Pooling层一般在网络中是跟在Conv卷积层之后,做采样操作,其实是为了进一步缩小feature map,同时也能增大神经元的视野。在Caffe中,pooling层属于vision_layer的一部分,其相关的定义也在vision_layer.hpp的头文件中。Pooling层的相关操作比较少,在Caffe的自带模式下只有Max pooling和Average poooling两种
caffe中Pooling的操作相对比较少,结构也简单,首先看它的Forward_cpu函数,在forward的时候根据相应的Pooling_method选择相应的pooling方法
void PoolingLayer<Dtype>::Forward_cpu(const vector<Blob<Dtype>*>& bottom,
      const vector<Blob<Dtype>*>& top) {
  const Dtype* bottom_data = bottom[0]->cpu_data();
  Dtype* top_data = top[0]->mutable_cpu_data();
  const int top_count = top[0]->count();
  //将mask信息输出到top[1],如果top大于1
  const bool use_top_mask = top.size() > 1;
  int* mask = NULL;  // suppress warnings about uninitalized variables
  Dtype* top_mask = NULL;
  switch (this->layer_param_.pooling_param().pool()) {
  case PoolingParameter_PoolMethod_MAX://这里的case主要是实现max pooling的方法
    // Initialize
    if (use_top_mask) {
      top_mask = top[1]->mutable_cpu_data();
      caffe_set(top_count, Dtype(-1), top_mask);
    } else {
      mask = max_idx_.mutable_cpu_data();
      caffe_set(top_count, -1, mask);
    }
    caffe_set(top_count, Dtype(-FLT_MAX), top_data);
    // The main loop
    for (int n = 0; n < bottom[0]->num(); ++n) {
      for (int c = 0; c < channels_; ++c) {
        for (int ph = 0; ph < pooled_height_; ++ph) {
          for (int pw = 0; pw < pooled_width_; ++pw) {
            int hstart = ph * stride_h_ - pad_h_;//这里的hstart,wstart,hend,wend指的是pooling窗口在特征图中的坐标,对应左上右下即x1 y1 x2 y2
            int wstart = pw * stride_w_ - pad_w_;
            int hend = min(hstart + kernel_h_, height_);
            int wend = min(wstart + kernel_w_, width_);
            hstart = max(hstart, 0);
            wstart = max(wstart, 0);
            const int pool_index = ph * pooled_width_ + pw;
            for (int h = hstart; h < hend; ++h) {
              for (int w = wstart; w < wend; ++w) {
                const int index = h * width_ + w;//记录index偏差
                if (bottom_data[index] > top_data[pool_index]) {//不停迭代
                  top_data[pool_index] = bottom_data[index];
                  if (use_top_mask) {
                    top_mask[pool_index] = static_cast<Dtype>(index);//记录当前最大值的的坐标索引
                  } else {
                    mask[pool_index] = index;
                  }
                }
              }
            }
          }
        }
        // 计算偏移量,进入下一张图的index起始地址
        bottom_data += bottom[0]->offset(0, 1);
        top_data += top[0]->offset(0, 1);
        if (use_top_mask) {
          top_mask += top[0]->offset(0, 1);
        } else {
          mask += top[0]->offset(0, 1);
        }
      }
    }
    break;
 case PoolingParameter_PoolMethod_AVE://average_pooling
    for (int i = 0; i < top_count; ++i) {
      top_data[i] = 0;
    }
    // The main loop
    for (int n = 0; n < bottom[0]->num(); ++n) {//同样是主循环
      for (int c = 0; c < channels_; ++c) {
        for (int ph = 0; ph < pooled_height_; ++ph) {
          for (int pw = 0; pw < pooled_width_; ++pw) {
            int hstart = ph * stride_h_ - pad_h_;
            int wstart = pw * stride_w_ - pad_w_;
            int hend = min(hstart + kernel_h_, height_ + pad_h_);
            int wend = min(wstart + kernel_w_, width_ + pad_w_);
            int pool_size = (hend - hstart) * (wend - wstart);
            hstart = max(hstart, 0);
            wstart = max(wstart, 0);
            hend = min(hend, height_);
            wend = min(wend, width_);
            for (int h = hstart; h < hend; ++h) {
              for (int w = wstart; w < wend; ++w) {
                top_data[ph * pooled_width_ + pw] +=
                    bottom_data[h * width_ + w];
              }
            }
            top_data[ph * pooled_width_ + pw] /= pool_size;//获得相应的平均值
          }
        }
        // compute offset同理计算下一个图的起始地址
        bottom_data += bottom[0]->offset(0, 1);
        top_data += top[0]->offset(0, 1);
      }
    }
    break;
  case PoolingParameter_PoolMethod_STOCHASTIC:
    NOT_IMPLEMENTED;
    break;
  default:
    LOG(FATAL) << "Unknown pooling method.";
  }
对于误差的反向传导 对于pooling层的误差传到,根据下式

这里的Upsample具体可以根据相应的pooling方法来进行上采样,upsample的基本思想也是将误差进行的平摊到各个采样的对应点上。在这里pooling因为是线性的所以h这一项其实是可以省略的。
具体的计算推导过程请结合http://www.cnblogs.com/tornadomeet/p/3468450.html有详细的推导过程,结合代码中主循环中的最里项会更清晰的明白
template <typename Dtype>
void PoolingLayer<Dtype>::Backward_cpu(const vector<Blob<Dtype>*>& top,
      const vector<bool>& propagate_down, const vector<Blob<Dtype>*>& bottom) {
  if (!propagate_down[0]) {
    return;
  }
  const Dtype* top_diff = top[0]->cpu_diff();//首先获得上层top_blob的diff
  Dtype* bottom_diff = bottom[0]->mutable_cpu_diff();
  caffe_set(bottom[0]->count(), Dtype(0), bottom_diff);
  // We'll output the mask to top[1] if it's of size >1.
  const bool use_top_mask = top.size() > 1;
  const int* mask = NULL;  // suppress warnings about uninitialized variables
  const Dtype* top_mask = NULL;
  switch (this->layer_param_.pooling_param().pool()) {
  case PoolingParameter_PoolMethod_MAX:
    // The main loop
    if (use_top_mask) {
      top_mask = top[1]->cpu_data();
    } else {
      mask = max_idx_.cpu_data();
    }
    for (int n = 0; n < top[0]->num(); ++n) {
      for (int c = 0; c < channels_; ++c) {
        for (int ph = 0; ph < pooled_height_; ++ph) {
          for (int pw = 0; pw < pooled_width_; ++pw) {
            const int index = ph * pooled_width_ + pw;
            const int bottom_index =
                use_top_mask ? top_mask[index] : mask[index];//根据max pooling记录的mask位置,进行误差反转
            bottom_diff[bottom_index] += top_diff[index];
          }
        }
        bottom_diff += bottom[0]->offset(0, 1);
        top_diff += top[0]->offset(0, 1);
        if (use_top_mask) {
          top_mask += top[0]->offset(0, 1);
        } else {
          mask += top[0]->offset(0, 1);
        }
      }
    }
    break;
  case PoolingParameter_PoolMethod_AVE:
    // The main loop
    for (int n = 0; n < top[0]->num(); ++n) {
      for (int c = 0; c < channels_; ++c) {
        for (int ph = 0; ph < pooled_height_; ++ph) {
          for (int pw = 0; pw < pooled_width_; ++pw) {
            int hstart = ph * stride_h_ - pad_h_;
            int wstart = pw * stride_w_ - pad_w_;
            int hend = min(hstart + kernel_h_, height_ + pad_h_);
            int wend = min(wstart + kernel_w_, width_ + pad_w_);
            int pool_size = (hend - hstart) * (wend - wstart);
            hstart = max(hstart, 0);
            wstart = max(wstart, 0);
            hend = min(hend, height_);
            wend = min(wend, width_);
            for (int h = hstart; h < hend; ++h) {
              for (int w = wstart; w < wend; ++w) {
                bottom_diff[h * width_ + w] +=
                  top_diff[ph * pooled_width_ + pw] / pool_size;//mean_pooling中,bottom的误差值按pooling窗口中的大小计算,从上一层进行填充后,再除窗口大小
              }
            }
          }
        }
        // offset
        bottom_diff += bottom[0]->offset(0, 1);
        top_diff += top[0]->offset(0, 1);
      }
    }
    break;
  case PoolingParameter_PoolMethod_STOCHASTIC:
    NOT_IMPLEMENTED;
    break;
  default:
    LOG(FATAL) << "Unknown pooling method.";
  }
}